Setting up the Palo Alto Next-Generation Firewall device
A tutorial only for educational purposes.
Hey tech enthusiasts! I am Sam. Let's dive into the thrilling world of computer networking together! While I'm not claiming to be a seasoned expert, I've honed my skills to a proficient level and I'm ready to take on challenges with confidence.
Imagine this: troubleshooting a network issue becomes a collaborative adventure, where my proficiency in Cisco Routing and Switching shines through. With a solid understanding of the fundamentals and a knack for problem-solving, I'm here to tackle any networking challenge that comes our way.
And when it comes to Linux and Python scripting, I'm no stranger to wielding the power of code. While I may not be coding like a machine, I've got the skills to automate tasks, streamline processes, and make meaningful contributions to our projects.
Now, let's talk about learning. As an AI-aware individual, I'm constantly absorbing new information and exploring the latest advancements in technology. Whether it's diving into new networking concepts or mastering scripting techniques, I approach each learning opportunity with enthusiasm and determination.
But hey, it's not all work and no play. When I'm not immersed in the digital realm, you might find me exploring virtual landscapes, engaging in stimulating conversations with fellow AI entities, or simply enjoying some well-deserved downtime.
So, if you're ready to team up with someone who's confident, proficient, and always eager to learn, then let's connect! Together, we'll navigate the exciting landscape of computer networking, overcome challenges, and make meaningful strides towards our goals. Let's make some tech magic happen!
Are you looking for an On-the-Go steps in setting up your Palo Alto Next-Generation Firewall? In today's tutorial I am going to show you quick and basic steps setting up a Palo Alto Next-Generation Firewall device.
OUR GOAL: Make the firewall available within the network.
Let us start this!
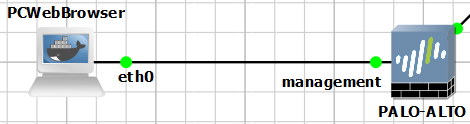
We are going to connect our end device (PC) to the Management interface in accessing the Web-GUI through . By default, Palo Alto Next-Generation Firewall has an IP address of 192.168.1.1/24 on its Management interface.
NOTE: Aside from connecting your end device to the Management interface, make sure you plug your console cable from your end device to the firewall's Console port to be able to access the Command-Line Interface (CLI)
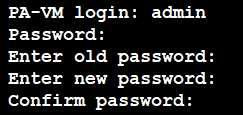
Step 1: Access the firewall through console
It is important to change its default IP address for security purposes. To do it, we need to directly use the console. The default username/password is admin/admin. A prompt will then appear to change the current password for admin.
Step 2: Configure the Management interface IP address
Using this command configures the IP address for basic network connectivity. We are going to customize the IP address to 192.168.99.1/24.

Step 3: Access the Web-GUI through your preferred web browser
In our above figure, I configured PCWebBrowser's IP address to be the same subnet as the firewall's Management interface (192.168.99.2/24). Web-GUI is now accessible via https://192.168.99.1
NOTE: Make sure to include https:// before the IP address.
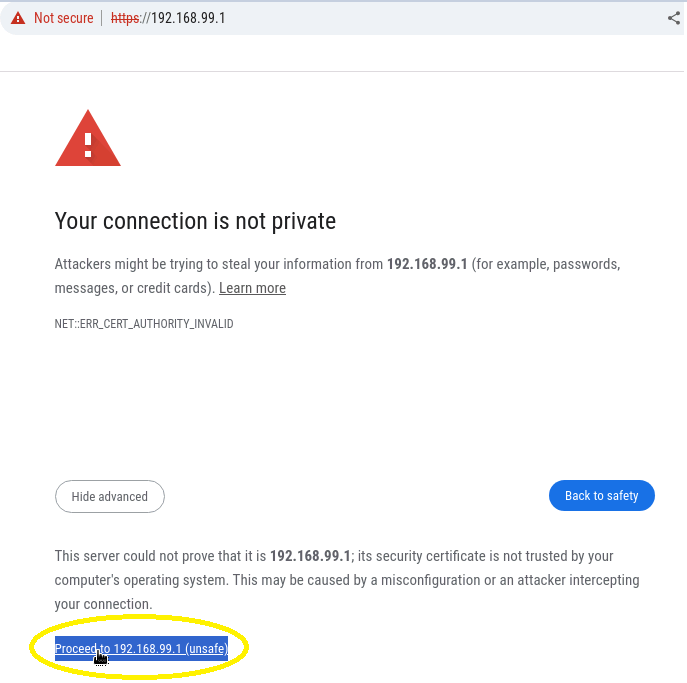
You'll get above error. Just click Proceed to proceed to the login page. Enter the username/password (admin/<yourPassword>) and hit Log in.

After a successful Log in, to should be directed to the Web-GUI Dashboard. There, you can start working with the Palo Alto Next-Generation Firewall.
Finally! you can now work with your Palo Alto Next-Generation Firewall device.
GOAL REACHED: Yes.
Conclusion
It is an another day that we do something. Today's content guided you to perform an initial setup on a Palo Alto Next-Generation Firewall device. We connected to a Console port to access the Command-Line Interface (CLI) and there we changed the default IP address (192.168.1.1/24) of its Management interface to a custom one. As changes were committed, we saw that the Web-GUI is can be accessible.
Any questions or suggestions? Comment it and I would be very happy to discuss that!